Migrating from Proprietary Java-Based CMS to WordPress (Case Study)
That’s it, we did it. Objectstyle.com is now powered by WordPress.
After sixteen years of maintaining our own custom-built CMS, we decided to shut it down. In this post, I’d like to describe the reasons for making this decision, and how the migration was carried out from a practical point of view.
Our CMS backstory
Around 2006, we created the first version of our proprietary CMS pretty much because we could. ObjectStyle was already a talented technology consultancy, capable of building a simple website. Our choice of Java as the main language for the CMS’s backend was dictated by the fact that we mostly employed Java programmers. Looking back at that decision, we think Java may have been overkill for what we were trying to do.
Come 2016 and we started to have thoughts of maybe switching to something else. However, WordPress was deemed too bloated and insecure at the time. So it was decided to carry on with the home-built CMS as long as it didn’t require too many resources to maintain. But that perceived simplicity of our CMS soon became a myth. As we added new types of content (case studies, job postings, highlighted content, etc.), the CMS became more complex. It required ever more development and testing. One day we woke up and realized it had turned into a full-scale project that devoured resources like an insatiable monster.
Eventually, we decided to pull the stops on our Java CMS and look for an out-the-box solution.
Our criteria for choosing a new CMS
It’s easier to choose a SaaS CMS when you have a clean slate. Then you can pick a theme to your liking and work within the specifics of the architecture at hand.
We didn’t start with a clean slate. We had an intricate front-end theme, which couldn’t be easily mapped to a random third-party solution without some things breaking. So we needed a “headless” capability that would allow us to use our own theme.
Plus, the CMS had to meet the following criteria:
- It should be cloud-based/SaaS
- Complete with a visual Editor
- Flexible (It should allow us to use our own styles and customize both the theme and the backend to our needs.)
- Developer-friendly (An ability to add APIs.)
- Basic SEO features (Canonical URLs, XML Sitemap, the Robots.txt file, control over meta data, control over og: parameters, etc.)
- Basic marketing features (Email forms, a UI for adding tracking codes like Google Analytics, Facebook Pixel, etc.)
- Reasonably-priced (It should not be an enterprise-grade CMS priced upward from $2,000 – we were looking to spend several hundred dollars per month at most).
We ended up with a shortlist of three choices: Wix, Webflow and WordPress. Yes, WordPress is not a SaaS CMS, but it is really no different from SaaS if you use it in combination with WPEngine (more on that later).
We also had considered Enonic and Wagtail, but found them to be more on the enterprise side. Plus, we emailed the folks at Ghost, having heard so many laudable things about this CMS. However, they replied that Ghost was primarily a “professional publishing platform”, which was not what we needed.
Once we moved into the trial phase, it became obvious that WordPress had the smoothest adoption curve (at least for us). In addition, two of the four people on our team had plenty of experience with it. So WordPress it was.
Creating a POC/MVP
At first, we decided to try out all three shortlisted CMSes (WordPress, Wix, and Webflow) by using them to replicate a non-trivial part of our site. Since we had the most experience with WordPress, we started with it.
It was decided to replicate our job posting functionality, which you can see on our Careers page. As simple as it looks, the functionality is not exactly straightforward. The page itself is a parent page, and each individual job posting is a child page. In WordPress terms, it’s an Archive > to > Page type of relationship.
In addition, each job posting has two statuses: “active” and “filled”. All “filled” job postings needed to be automatically put in a separate category and automatically excluded from the XML Sitemap. We were able to achieve this using the AIO SEO plugin, since it lets you exclude “taxonomy terms” from the Sitemap.
It took us surprisingly little time – about three or four days – to replicate the functionality in WordPress, including the website’s header, footer and homepage. Then we did a demo for the project’s stakeholders and showed them our WordPress-based MVP, which was the exact copy of our existing website.
Since things went so well with WordPress, we decided not to create MVPs with the other two CMSes after all. We did poke around them for a while just to see how things worked under the hood, but didn’t go any further.
Planning for the migration
Our initial plan was to move to WordPress in the course of approximately four months. In reality, it took a little over six months to complete the migration.
At first, we did an inventory of the old CMS:
- A list of static pages + fields that are filled out on the back-end.
- A list of blog articles + fields that are filled out on the back-end.
- A list of article categories and tags.
- A list of CMS users and their roles.
- A list of email forms + their respective fields (with validation rules and messages for each) + destination email addresses.
- Any redirect rules we had.
- Any link handling rules we had. (E.g., “all third-party links should open in a new tab”.)
- A full list of blog functionality pieces. (E.g., lazy loading of YouTube comments, Disqus comment settings, “Related blogs” and other shortcodes, a list of Visual Editor buttons, etc.)
- The image delivery system. (CDN, naming rules, optimal image sizes, etc.)
- A full list of marketing features. (Analytics scripts, open graph settings, etc.)
- An inventory of SEO settings. (Canonical tags, XML Sitemap and robots.txt settings, and others.)
- A list of downloadable materials. (E.g., case study PDFs.)
While moving to a new system, it’s critical that you preserve the website’s URL structure, internal linking patterns, image/video destination URLs, and SEO settings. This is a lot to keep in mind, but it’s worth it if you wish to retain the website’s SEO value.
Based on the inventory, we created a migration plan. We were to release the website in stages, beginning with simpler pages and finally adding the blog, which is a complex system on its own. Needless to say, we revised the plan several times during the project, because not everything went according to plan. 🙂
Setting up the environment
WPEngine is, arguably, the best-known WordPress hosting that offers a plethora of WordPress management tools. It is mostly thanks to WPENgine that our migration project was completed successfully.
WPEngine offers three environments: development, staging and production. These three are considered “1 website.” Any environment can be protected with a password with the push of a button.
Each WPEngine plan includes a certain number of visits. We asked how WPEngine counted visits and learned that it uses the notion of “billable visits”. Any hits from a unique IP address in a 24-hour period count towards 1 billable visit. If you go over the allocated limit, you pay an overage of $2 per 1,000 extra visitors. Meanwhile, the website stays operational. (That was a big plus for us.)
Most plans offer Smart Plugin Manager and Global Edge Security as “optional add-ons.” These two instruments proved invaluable to us.
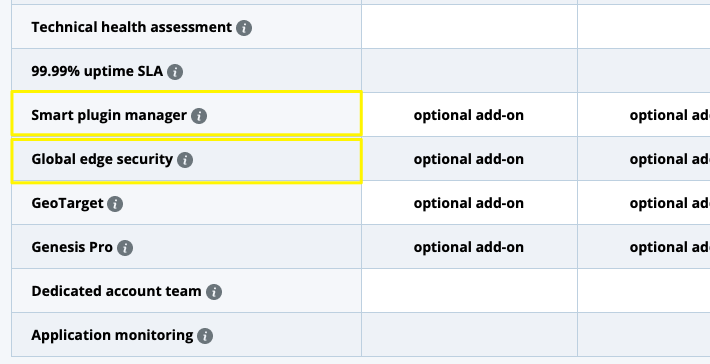
As you may know, keeping WordPress plugins updated is a challenge. If you don’t update them on time, security may be compromised. So we added the Smart Plugin Manager add-on, which autonomously checks for plugin updates, installs them and rolls back changes, if necessary. In our six months or so with WordPress, we never had to worry about plugin updates.
We also added Global Edge Security, which gives you things like WAF, advanced DDOS protection, and automatic SSL installation. In addition, it comes with Cloudflare CDN implemented at a DNS level. (A great alternative to WPEngine’s default CND, MaxCDN, which is due to be deprecated in 2022.)
Challenges we faced during migration
Since we were releasing the website in stages, some releases were simpler than others.
Static pages
We carried over static pages without much problem. There were some hiccups related to the website’s URL structure, but that was it.
Contact forms
We used Contact Form 7 to reproduce our website’s existing contact forms in WordPress. This plugin is considered the default standard by the WordPress community. We carefully replicated existing validation rules and error messages. The only thing we could not carry over was realtime validation. In WordPress, validation begins after the user clicks “Send.” There may be a better way to do it, which we have not yet discovered.
Image files
It’s important to keep image file names and alt tags intact during the migration. They have a lot of SEO value. At first, we were thinking of uploading the images to the Media Library in WordPress and redirecting them to the old URLs. But redirects create a significant lag. So we simply uploaded old images to the WordPress server, while preserving the file structure.
New images are now handled by the native Media Library. Also, our images are now served using Cloudflare CDN, which is a part of the Global Edge Security plugin.
Blog articles
We had close to 100 articles published at the time of the migration.
Step 1: We performed an XML export from a PostgreSQL database.
Step 2: We then normalized article fields (date created, author, title, excerpt, ID, etc.) to make them compatible with the fields in WordPress.
Step 3: We used the standard Importer in WordPress to import these data to the WordPress database.
The migration of shortcodes didn’t go entirely well. We thought the errors were sporadic, but then discovered some regularities:
- When a parameter value starts with a numeral, the ‘single apostrophe’ disappears from the backend, which results in only the numeral showing on the front end. (E.g., only “5…” is showing, instead of “5 Reasons to Move to WordPress”)
- When a parameter value contains the code-type apostrophe (‘), the content is not showing on the front-end at all. Replacing it with a text-type apostrophe (’) solves the issue.
- When a parameter value starts with square brackets [], the content is not showing on the front end. Replacing them with round brackets () solves the issue.
Also, our articles had been written over many years. Some were written using an HTML editor, while others were written using our new markdown editor. As a result, the exported articles came in various formats: only HTML, HTML mixed with markdown, only markdown.
We anticipated that problems would arise, if we imported this wild mix into WordPress. So we installed the Jetpack plugin, which allows you to compose articles in markdown, among other features. The articles were imported without a problem (except for the shortcode issues I already mentioned). However, we later noticed that Jetpack was making the writing process wobbly, especially when it came to creating shortcodes. So we tried switching off the “compose in markdown” feature and – to our relief – markdown automatically converted to HTML. Then we turned off the plugin altogether.
In Conclusion
That was our experience with migrating from a custom-built Java CMS to WordPress. Hopefully, you find it useful. While you may have a very different system to migrate from, it’s possible that the steps and solutions we described will help you do it faster.
Related Blogs

“Headless” is where the modern CMS is headed
LEARN MORE
